Showing posts with label Indigo Dyeing. Show all posts

Saturday, February 4, 2023

SHIBORI GIRL MOONS

This past year I participated in
Glennis Dolce's Moon of the Month subscription
and received 2 Indigo dipped moons every month 
with a complete list of the fabrics used and any other tidbits she wanted us to know
about the making or significance of them.
She just started it up again and it's not to late to subscribe for 2023.
It was so much fun never knowing what size and shaped moons she'd create
 and what special fabrics she'd use,
oftentimes cutting into old kimonos she's brought back with her from Japan.
Glennis also has a tour guided trip to Japan this year that looks amazing.
I believe there are a few spots left too.

Glennis is a wealth of information on Japan and Shibori.
She also offers many other courses, cards and pieces she has made,
 several of them she has slow stitched into banners and bags.

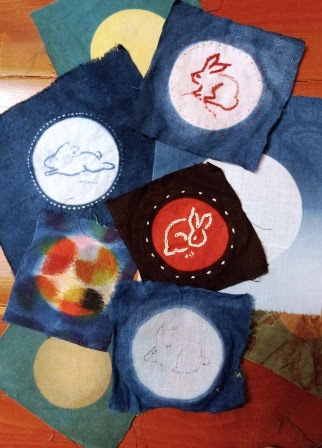
Above are only a few of the 24 moons she sent out this past year.
With the December moons she also sent out six different rabbit silhouettes 
that she suggested we stitch onto a few of the moons 
since this is the year of the Rabbit.

I did a few and wasn't sure if I liked them,
 but when I saw this pix of them I think I might do a couple more 
before I sew them together in some type of banner.
My dear blogger friend Liz from I'm going to Texas
also participated in the monthly moons
 and has already started to sew hers onto a Quilt top.
Can't wait to see how it turns out!

Sunday, September 26, 2021

TRYING TO COVER UP SOME STAINS

I thrifted this adorable child's top that had been stained in a few places.
So first I tried to Eco-dye it with leaves and flowers from garden.
It was a big fail.
Next I stitched a few Shibori designs into it that I had seen on Glennis Dolce's site,
and dipped into my indigo vat.
Better but still not perfect.
Not sure where I'll go next with this,
but I'm thinking to embroider around the designs to take one's eye off the stains.
Or just maybe put it aside for a couple of years.
I might be over it.

Thursday, September 23, 2021

MORE SHIBORI SAMPLERS

    In the Tuesday Nite Fiber Arts class I've been teaching for about a year and a half now,
we tried out many samplers.
These are a few of mine I experimented with. 
A simple dandelion (note: I forgot to pull the string for the stem above),
thus the stem looks lighter in value then the leaves and flower after stitching was removed.
Also, 
that old thrifted sheeting must have had some oil spots that weren't removed in the cleaning.
I will probable stitch a few bugs over top them.
I believe I've mentioned several times that I love when things like that go wrong.
It forces me to think of more creative solutions.

In this next piece,
 I'm sorry I was too lazy to go back and rotate it to match the finish product below.
Here it is pulled tightly ready for the dip into the indigo bath.
And below after the stitches were removed.

Here is another that I didn't''t bother to rotate,
and it's pulled form below.
The result below.

For some reason I stopped taking photos at this point,
 but managed to get the end result which I really loved here.
It almost feels like a Native American Medicine Wheel.

I also want you to note that unlike the flag I posted the other day,
none of these pieces turned out as bright blue as the flag did.
That's because all of us were using the same vat with many experiments and it became a bit depleted.
So the blue is much more subdued in these samples.
The next time I use the indigo vat I will replenish it.
I was trying to remember the other day how long I've had this vat going
 so I actually went back and searched the blog.
I went back to June 30th, 2012 in a post titled "Shibori Workshop-Part I"
where Long Beach, Ca. artist Shibori Girl Glennis Dolce came to my home/studio
 to teach my students and I the art of Shibori and Indigo Dyeing.
Glennis is a wonderful teacher, 
a fountain of information, 
 and actually grew up in Japan speaking the language.
(I believe she was an army brat there)
Glennis is still teaching thru her website and also at the Japanese American Museum in Los Angeles.
She travels every year back to Japan,
usually leading a tour of Fiber Artists to shop and learn more.
If you ever get a chance I would at lest recommend a visit to her blog and shop.
(Address above)


Wednesday, September 22, 2021

A FEW E-MAILS LATER

A few of you e-mailed and asked for the directions to stitch the Shibori flag with. 
 I looked back thru my photos and found a picture of it.
To get two different value ranges on the front side of fabric,
I running stitched the star area on the front of piece,
 then I flipped piece over and stitched striped area from the back side.
And if you've never tried Shibori,
 you then pull as tightly as you can on each of the doubled threads and knot them along design edge.
It will look something like this below.
I then went into my indigo vat,
but you could go into any natural or commercial dye you have available.
I believe I dipped this at least 3 times into the indigo vat,
rinsed and ironed it,
 then ran it thru my washing machine with my darks and into the dryer.
Of course I used 100 % cotton from an old sheet (garage sale find).
The older sheets are easier to stitch thru.
And of course I wash them in my hottest water with a bit of bleach to get them sparkly clean first.
Don't want any cooties.
Ha ha

Tuesday, September 14, 2021

TO HONOR OUR FALLEN HEROS

A Shibori stitched flag dipped in my indigo vat.


Sunday, June 28, 2020

MOONMATES

is one of my favorite go to Fiber Artists
 who specializes in several Japanese Textile traditions. 
I recently learned that Glennis grew up in Japan 
and tries to return at least once a year;
many times leading a tour group to her favorite haunts,
a trip that is definitely on my bucket list.
Two weeks ago I ordered several of her lovely moons that she creates.
If you visit her blogsite you will she makes video tutorials 
so you can learn from her and see her process.
And she is a patient, inspirational teacher.
She calls them Moonmate tutorials.
I love the moons she picked for me on all types of different fabrics above!

She also has Shibori and Sashiko dyed and stitched pieces to purchase
and other amazing textiles.
In one of her tutorials I watched her working on this banner and feel in love.
I am currently decorating a room in my son's new/old home because I send the night when I drive up. 
He and his wife Nicole recently purchased a single family home in the San Fernando Valley
(in the same neighborhood that actor Brian Cranston grew up in)
and because of the long trek there thru the bumper to bumper Los Angeles Fwy system 
it's not worth it to drive up and back on the same day.
So the kids gave me my own room.
How about that!!!!!!
So my plan has been to decorate it in a bit of a Japanese style 
with lots of  Shibori textiles, handmade ceramics, 
and handmade wood pieces.
The color scheme is complimentary blues and rusty oranges.
And this banner by Glennis is my most recent purchase for the room.
One of my favorite parts of the banner are the 3 small wool squares that are dyed and beaded.
Brilliant!
And her stitching flows so beautifully about piece in a very organic yet controlled  way,
which is right up my alley.
And check out her sweet little moons along the bottom.
In her tutorial when stitching this piece you can see how she uses her thimble.
It's a special one for Sashiko and is worn on the inside of the hand.
You've got to check it out.
Fascinating!

Sunday, June 30, 2019

SHIBORI GIRL - GLENNIS DOLCE

A friend that I made thru blogging,
a local So.Cal. expert in the art of Shibori,
takes an eager group of students to Japan every year and always returns with treasures.
This year in her shop,
 I was able to purchase many of the pieces listed below in her letter. 
She bundled the letter around the precious remnants,
and they did not disappoint.
Below are shoots and close-ups of all that I bought.
I've been thinking about what to use them for.
 So far I have a favorite pair of jeans that the holes have become too large in,
 I think I might cut off a piece of each fabric to mend them with.
After that I'm not sure.


the family crest button a top an indigo dyed loosely woven fabric


a vintage piece of boro cloth

two different pieces of Ikat dyed and woven fabric
close up below

two more pieces of Ikat
Just a note.
I did learn the art of Ikat dyeing and weaving in college (1979),
and I remember how extremely time consuming and difficult it was 
so it is fabulous to see the real thing in person.

honestly, I'm not sure what this cloth is called.
got to do some research.
but isn't it lovely?
you can see how old it is where the two worn areas are.

This last one is my favorite because it's my go-to technique to do with my students
in the Beginning 3-D class.
The favorite of all the Shibori techniques that Glennis taught us.
This cloth was all all hand stitched, pulled tightly then dipped into the Indigo vat.
When dry the stitching was removed to reveal the design.
This piece was so expertly done,
so clear in it's design, and the dye so perfectly applied,
rich and dark.
When I saw it in the packet my eyes just popped with happiness!

And I already know the first thing I will do with snall pieces of each remnant,
I'm going to mend/patch a loved pair of holey jeans.
Anding it to my list right now!

Monday, April 29, 2019

CULTURAL STUDIES

JAPANESE SHIBORI
BEGINNING 3-D ART
recycled cotton sheeting, sharps needles, heavy sewing thread in "red", indigo vat
gloves optional

I love this assignment because I get to make a demo piece right along with the kids
and it's so creative, portable and therapeutic (relaxing).
I also really enjoy refreshing our indigo vats.
I keep two 5 gallon buckets going all year long.
And once you start one you can keep it going indefinitely.
I think my 1st bucket is going on 8 years now
since I first started teaching this assignment.

There are so many Shibori techniques to try.
I do folding and clamping with my 7th graders,
and hand stitched designs with my Beginning 3-D kids.
We make one practice piece and then each child makes an original design
with two or more of their favorite techniques they practiced.
That's what I'm sharing here,
their original, creative designs.

We start with the lovely piece above by senior Inna Sikar.
And below Inna's is her buddy Hana Kim's.
Both are so gorgeous and uplifting.
I especially love the varied shades of Indigo in each of the pieces.


The stitching of the design is fun and relaxing.
The most challenging part is the pulling and tying off of all the threads 
after all the stitching is done.
If you don't pull tight enough your design will disappear after all that stitching,
tying and dipping.

The one above was made by junior Kareema Mohamed
 and below hers is the work of junior Kiana Hernandez.
These two cuties sat right next to each other last year 
and it's so cool to see how different their designs are.


The next step after the pulling of the threads is the dipping of the crumpled up piece
 into the Indigo vat.
I try to refresh the vat with Pre-Reduced Indigo from Dharma Trading 
so that if the kids do at least 3 separate dips they will get a dark beautiful indigo blue.
What's really crazy is that I hate measuring out anything,
so I do it by eye and experience,
then I do a test before the students use the dye.
I usually get lucky.
It's kind of how I cook too,
Ha!

Above we have the work of senior Ricky Gallardo, 
and below is a banner by junior Dustine Ansiboy.
I so wish I could have enlarged Dustine's so you could have seen it better.
I love that she worked it into a elongated rectangular banner rather than square.

The young ones get to pick the size and format they wish to work too.
I always tell them don't bite off more than you can chew.
Mostly they don't listen to me on that one.
LOL

I also loved this circular piece by senior Sophie Yang above.

I felt that 8th grader Bhumika Kalaimalai put the most stitching into her original piece.
She stitched and pulled on this piece for hours!
And the result was amazing as you can see.

But one of my favorites was this one below by 8th grader Yusuf Karan.
I adore the flowers around the bunny.
So sweet!
And I also like all the values of blue he achieved.
It really adds to the beauty of the design.
Thank you all for working so hard on this assignment.
It was such a pleasure showing off your work.
xoxoox

Monday, February 11, 2019

FRENCH GENERAL INSPIRED

Over the Thanksgiving holiday I spent the weekend with my son and his fiance'.
They asked me where I'd like to visit and I immediately said French General,
a fabulous French based arts, crafts & antique store in downtown L.A.
It was my second visit to this impressive store,
and to really see everything it would take at least an hour.
But I tried really hard to not make the kids wait that long.
  LOL 
I spotted this very cool Boro Tote kit.
It came in Indigo or French Reds.
I asked Zach's fiance' Nicole if she liked the look of the finished tote on the package
and which color she preferred.
She chose the Indigo Blue.
YES!!
I was actually buying it for her mother as a Xmas gift.
Her mother Mary is an outstanding stitcher/quilter/knitter,
but after I brought it home to wrap I just couldn't seem to part with it.
It seemed to be calling to me.
So I ended up getting Mary something else just as nice.
I've been interested in Japanese Boro for about the past 5 years,
researching the techniques,
even looking for an original antique piece to buy to teach with from Japan.
But I've never used the technique myself.
It's a mending process,
used for hundreds of years to patch clothing with.
I rationalized this was my big chance to try it out.
So I kept the kit for myself and worked on it my entire Xmas break and beyond.
I have to be honest,
at first I wasn't a fan,
but the more I stitched the better I liked it.
Hundreds of stitches go into it, 
and I was sewing thru 3 layers of cloth;
the indigo fabrics, many of them overlapped,
a piece of cotton batting and the linen tote,
so sometimes 4 where the overlaps were.
What was really great was that there were leftover Indigo fabrics,
so I used them to make a pocket on the inside (above).
which wasn't part of the original kit instructions.
I also didn't use the stitch patterns they suggested.
In addition,
I wanted the bag to have more structure so I sewed up the bottom corners,
(something else that wasn't in the instructions),
used a piece of Indigo Shibori fabric I had in my stash,
and a piece of plastic netting material,
and made a bottom to support the bag.
All hand sewn and appliqued.
A 7th grader last year had given me an Indigo dyed velvet button he made as a gift.
I saved it and used in on the front along with an antique crochet covered button from my stash.

This Wednesday I'll be attending the courthouse wedding of my son Zach to Nicole,
and it will be one of their many wedding gifts I have planned.
I'm super excited and just can't believe this day is finally here.
We will be flying to Hawaii for their actual destination family/friend ceremony 
so I'm hoping they can use it as their beach/travel bag.
The courthouse wedding is just a technicality 
because the state of California requires it if you are getting married out of state.
This is news to me.
But two celebrations are better than one!

P.S.  I gave the bag a good washing to help fray many of the cloth edges
Look closely at the third photo.

Monday, September 3, 2018

THANK YOU GLENNIS DOLCE

SHIBORI
7TH GRADE ART WHEEL - 2ND QUARTER - 2017-2018
white paper towels, Indigo vat, washed cotton squares, rubber bands, string

This project is so in vogue right now, 
even Target is selling Indigo dyed and patterned pillows, sheets, etc.
I began working with Indigo several years back 
when I took a class with Shibori Girl,
Glennis Dolce.
You can see her blog under Artists I Follow on the right column of my blog.
Her work is quite remarkable,
She usually takes a trip to Japan every year to collect fabrics and learn more techniques.
My 7th graders love this assignment because they get to turn their hands blue,
or not (I have gloves for them to wear).
Plus it's so much fun to see who does the most amount of dips
and achieves the darkest, blackest blue.
Of all the Shibori pieces done by 7th graders,
 I think this one by Kayla Vicencio is probably one of my all time favs.
I just adore the design she used and the ranges of values she achieved.
It took my breathe away the first time I saw it,
and still continues to do so.

This next one by Kayla Hamakawa is also really cool.
It almost reminds me of butterfly wings but going in opposite directions.

Krystal Lin got her piece to go in the perfect traditional tye-dye circle within a circle design,
and it almost looks like it's being kissed by the sun's rays.

Esther Lee used a more contemporary design technique
 where you pinch the cloth in a spot then start to twist into a cinnamon roll and bind.
It reminds me a bit of a spiral sea shell. 

Another favorite of mine from this group was created by Salome Agbaroji.
Isn't this just the most gorgeous example of a jelly fish floating in water?
A stunning work Salome.

And if you are wondering how some of the kids got those wonderful rusty shapes,
they had an option to wrap or clamp rusty objects I've collected for them into their cloth designs.
 This super cool piece was done by Zoe Hoksbergen.