Showing posts with label Shibori. Show all posts

Saturday, February 4, 2023

SHIBORI GIRL MOONS

This past year I participated in
Glennis Dolce's Moon of the Month subscription
and received 2 Indigo dipped moons every month 
with a complete list of the fabrics used and any other tidbits she wanted us to know
about the making or significance of them.
She just started it up again and it's not to late to subscribe for 2023.
It was so much fun never knowing what size and shaped moons she'd create
 and what special fabrics she'd use,
oftentimes cutting into old kimonos she's brought back with her from Japan.
Glennis also has a tour guided trip to Japan this year that looks amazing.
I believe there are a few spots left too.

Glennis is a wealth of information on Japan and Shibori.
She also offers many other courses, cards and pieces she has made,
 several of them she has slow stitched into banners and bags.

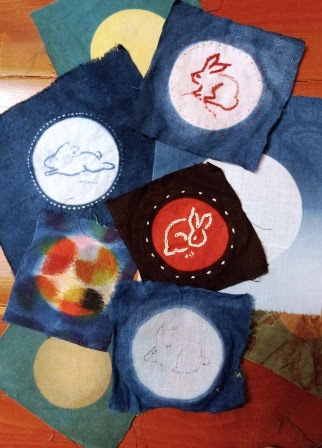
Above are only a few of the 24 moons she sent out this past year.
With the December moons she also sent out six different rabbit silhouettes 
that she suggested we stitch onto a few of the moons 
since this is the year of the Rabbit.

I did a few and wasn't sure if I liked them,
 but when I saw this pix of them I think I might do a couple more 
before I sew them together in some type of banner.
My dear blogger friend Liz from I'm going to Texas
also participated in the monthly moons
 and has already started to sew hers onto a Quilt top.
Can't wait to see how it turns out!

Sunday, September 26, 2021

TRYING TO COVER UP SOME STAINS

I thrifted this adorable child's top that had been stained in a few places.
So first I tried to Eco-dye it with leaves and flowers from garden.
It was a big fail.
Next I stitched a few Shibori designs into it that I had seen on Glennis Dolce's site,
and dipped into my indigo vat.
Better but still not perfect.
Not sure where I'll go next with this,
but I'm thinking to embroider around the designs to take one's eye off the stains.
Or just maybe put it aside for a couple of years.
I might be over it.

Thursday, September 23, 2021

MORE SHIBORI SAMPLERS

    In the Tuesday Nite Fiber Arts class I've been teaching for about a year and a half now,
we tried out many samplers.
These are a few of mine I experimented with. 
A simple dandelion (note: I forgot to pull the string for the stem above),
thus the stem looks lighter in value then the leaves and flower after stitching was removed.
Also, 
that old thrifted sheeting must have had some oil spots that weren't removed in the cleaning.
I will probable stitch a few bugs over top them.
I believe I've mentioned several times that I love when things like that go wrong.
It forces me to think of more creative solutions.

In this next piece,
 I'm sorry I was too lazy to go back and rotate it to match the finish product below.
Here it is pulled tightly ready for the dip into the indigo bath.
And below after the stitches were removed.

Here is another that I didn't''t bother to rotate,
and it's pulled form below.
The result below.

For some reason I stopped taking photos at this point,
 but managed to get the end result which I really loved here.
It almost feels like a Native American Medicine Wheel.

I also want you to note that unlike the flag I posted the other day,
none of these pieces turned out as bright blue as the flag did.
That's because all of us were using the same vat with many experiments and it became a bit depleted.
So the blue is much more subdued in these samples.
The next time I use the indigo vat I will replenish it.
I was trying to remember the other day how long I've had this vat going
 so I actually went back and searched the blog.
I went back to June 30th, 2012 in a post titled "Shibori Workshop-Part I"
where Long Beach, Ca. artist Shibori Girl Glennis Dolce came to my home/studio
 to teach my students and I the art of Shibori and Indigo Dyeing.
Glennis is a wonderful teacher, 
a fountain of information, 
 and actually grew up in Japan speaking the language.
(I believe she was an army brat there)
Glennis is still teaching thru her website and also at the Japanese American Museum in Los Angeles.
She travels every year back to Japan,
usually leading a tour of Fiber Artists to shop and learn more.
If you ever get a chance I would at lest recommend a visit to her blog and shop.
(Address above)


Wednesday, September 22, 2021

A FEW E-MAILS LATER

A few of you e-mailed and asked for the directions to stitch the Shibori flag with. 
 I looked back thru my photos and found a picture of it.
To get two different value ranges on the front side of fabric,
I running stitched the star area on the front of piece,
 then I flipped piece over and stitched striped area from the back side.
And if you've never tried Shibori,
 you then pull as tightly as you can on each of the doubled threads and knot them along design edge.
It will look something like this below.
I then went into my indigo vat,
but you could go into any natural or commercial dye you have available.
I believe I dipped this at least 3 times into the indigo vat,
rinsed and ironed it,
 then ran it thru my washing machine with my darks and into the dryer.
Of course I used 100 % cotton from an old sheet (garage sale find).
The older sheets are easier to stitch thru.
And of course I wash them in my hottest water with a bit of bleach to get them sparkly clean first.
Don't want any cooties.
Ha ha

Tuesday, September 14, 2021

TO HONOR OUR FALLEN HEROS

A Shibori stitched flag dipped in my indigo vat.


Monday, April 29, 2019

CULTURAL STUDIES

JAPANESE SHIBORI
BEGINNING 3-D ART
recycled cotton sheeting, sharps needles, heavy sewing thread in "red", indigo vat
gloves optional

I love this assignment because I get to make a demo piece right along with the kids
and it's so creative, portable and therapeutic (relaxing).
I also really enjoy refreshing our indigo vats.
I keep two 5 gallon buckets going all year long.
And once you start one you can keep it going indefinitely.
I think my 1st bucket is going on 8 years now
since I first started teaching this assignment.

There are so many Shibori techniques to try.
I do folding and clamping with my 7th graders,
and hand stitched designs with my Beginning 3-D kids.
We make one practice piece and then each child makes an original design
with two or more of their favorite techniques they practiced.
That's what I'm sharing here,
their original, creative designs.

We start with the lovely piece above by senior Inna Sikar.
And below Inna's is her buddy Hana Kim's.
Both are so gorgeous and uplifting.
I especially love the varied shades of Indigo in each of the pieces.


The stitching of the design is fun and relaxing.
The most challenging part is the pulling and tying off of all the threads 
after all the stitching is done.
If you don't pull tight enough your design will disappear after all that stitching,
tying and dipping.

The one above was made by junior Kareema Mohamed
 and below hers is the work of junior Kiana Hernandez.
These two cuties sat right next to each other last year 
and it's so cool to see how different their designs are.


The next step after the pulling of the threads is the dipping of the crumpled up piece
 into the Indigo vat.
I try to refresh the vat with Pre-Reduced Indigo from Dharma Trading 
so that if the kids do at least 3 separate dips they will get a dark beautiful indigo blue.
What's really crazy is that I hate measuring out anything,
so I do it by eye and experience,
then I do a test before the students use the dye.
I usually get lucky.
It's kind of how I cook too,
Ha!

Above we have the work of senior Ricky Gallardo, 
and below is a banner by junior Dustine Ansiboy.
I so wish I could have enlarged Dustine's so you could have seen it better.
I love that she worked it into a elongated rectangular banner rather than square.

The young ones get to pick the size and format they wish to work too.
I always tell them don't bite off more than you can chew.
Mostly they don't listen to me on that one.
LOL

I also loved this circular piece by senior Sophie Yang above.

I felt that 8th grader Bhumika Kalaimalai put the most stitching into her original piece.
She stitched and pulled on this piece for hours!
And the result was amazing as you can see.

But one of my favorites was this one below by 8th grader Yusuf Karan.
I adore the flowers around the bunny.
So sweet!
And I also like all the values of blue he achieved.
It really adds to the beauty of the design.
Thank you all for working so hard on this assignment.
It was such a pleasure showing off your work.
xoxoox

Tuesday, March 20, 2018

WOVEN GIFT CARD JOURNALS

WOVEN FABRIC GIFT CARD JOURNALS
BEGINNING 3-D ART
cotton fabric, indigo bucket, tye-dye buckets, solar printing fabric, cardstock in various colors,
multi-colored sewing threads, sewing notions,beads, buttons & other embellishments

Earlier in the year the kids learned how to create a journal with fabric & stitch,
so I thought it would be cool to have them make a whole new decorative piece of fabric
 to cut up and weave with for another journal.
This would be their cover,
and their would be revisiting a former assignment that I didn't have to re-teach
because we were running out of time as it was the end of the year
They had enjoyed the paper weaving so they were excited to give this a try as well..

OMG,
my art room was buzzing with energy as the kids got these journal covers underway.
Because this was their 4th Quarter Final,
I wanted them to revisit and reuse their favorite printing/dyeing or shibori technique
to create a very beautiful piece of fabric 
that was to be cut up and woven into their journal cover page.
The results were spectacular as you will see.
Junior Connie Wu created the most glorious piece of tye-dye to work with.
I brought in my own multi-colored quilting threads for the kids to use as warp string
which they threaded thru a sturdy piece of card stock.
You can really see those multi-colors in the close-up below.
Then they wove their cut weft pieces thru. 
The hardest part for many of them was carefully and exactly cutting 
an opening into another piece of card stock to frame out their weaving with.
This piece of paper was to be the front and back cover of the journals
with an extra flap that covered their knots on the backside of the cover.
Very complicated and had to be demoed many times.
Of course next came the handmade signature papers for their journal pages
which they strung in with waxed linen in a figure eight pattern.
I also required the embellishment of beads on the string ends.

Junior Margaret Yiu also came up with a spectacular piece.
She made 2 tye-dye pieces to work with and alternated them.

So very beautiful wsa this more subtle one by junior Rachel Kannampuzha.
Can you figure out her clever alternation pattern
which makes this look so terrific?

Senior Sarah Woo reused a practice piece that she had made for the Solar Dyed Pillow project.
I love that she chose to weave it with orange paper for more of a mixed media effect.
I also really liked her diagonal lines.

These next two belong to seniors Vicky Hur & Daphne Wang.
Let's see what they did.
I believe Daphne used 2 pieces that went into the indigo bucket.
One light the other more dips for a darker value.
And below is a close up of Vicky's.
Looks like she used a piece of her stitched Shibori fabric thru the center,
and a tye-dye strip on either end.
I really like that effect!
Makes a nice border around the special Shibori piece.
Also note that both Daphne and Vicky are warping on the horizontal rather then the vertical.
Nice!
Below is a close-up of the inside of Vicky's journal pages.
I like that she has used different colors and different sizes of paper 
for more interest.
Also note below on the cover backside
 that there is a flap of card stock that covers all the inside knots and strings.
We used a glue stick for that so it didn't warp the card stock paper.

This little cutie belongs to senior Julie Ahn.
Looks like she also alternated a couple different tye-dye fabrics.
And note that her journal cover opens on the horizontal rather then the vertical.
for that the beads flow over top.
Senior Saba Fatima also chose to have hers open horizontally.
I love her tye-dye fabric as well as how her beads hang thru the middle.
This next one was made by English Teacher Donna Hall,
and she wrote inside it and gave to me as a thank you card/journal at the end of the school year.
What you can't see real well in the photo 
is the tiny pair of scissors that hang with the beads,
 and the metal tag that says "Made with Love".
And let me show you the love and effort that she put inside this journal.

We all loved the effect that junior Lynette Lee got with this piece of paper towel 
that went into the tye-dye bath.
And when she wove with it,
notice the perfect alignment with itself.
So gorgeous!

8th grader James Lara turned out a super cool journal as well.
He dyed thicker cotton string then wove a difficult "Ying-Yang" symbol.
And the buttons looked great over top.
I also appreciated that he incorporated several of his Polymer bead creations from earlier in the year.

Oh my,
look at these pretties by juniors Britney Hong & Samantha Tan.
Both girls made new tye-dye pieces 
and it looks as if they both off set them rather then perfectly lining the strips up over top each other.
It gives both pieces a really op-art type of look.

And then we have 8th grader Yusra Azmi.
Always an outside of the box thinker,
she usually comes up with some very clever,
 never done before ideas.
We all really liked her design and how she wove it.
Instead of setting up he warp vertically or horizontally,
she warped in a circular way like we did on our dream catchers.
I believe she dyed some yarns in our tye-dye buckets,
but it's what she did with pen & ink on her cover that I really enjoy.
A bit of Zentangling.
Ok,
 are you ready for this one by 8th grader Dylan Lin?
It is an absolutely remarkable creation using the stitched Shibori method we learned.
But instead of going into the Indigo bucket,
he went into the black tye-dye bucket for a super cool effect.
Since the black bucket was loosing it's potency,
instead of showing up solid black,
Dylan manged to get lots of purpely grey values
 which made his stitched bug look even scarier.

We end with para-educator Couch Milan.
First he made a lovely piece of tye-dye cloth,
but it's what he did with the cover that we all respected.
Using an x-acto, 
he cut out a nighttime landscape.
What a great idea!! 

So what started with simple paper weaving 
turned into something incredible with these creative young minds.
Thanks all of you for a really wonderful year.

Friday, February 2, 2018

DIPPITY-DO

JAPANESE SHIBORI
BEGINNING 3-D ART
laundered cotton fabric, heavy duty thread in red, sharps needles & indigo vat

Even though we had done a lot of hand stitching in various assignments last year,
the kids all of a sudden wanted to stitch on these cotton squares.
They were fascinated by the whole process,
and it's always a lovely surprise to open them up and see the results.
And of course,
they always love sticking their hands and dipping their cloth into the indigo vat.

This is what the cotton looks like after being stitched, pulled up tight and knotted.
Now it's ready for the indigo vat.
You want to see the results?

Wella!
Junior Jillian Morris put an extra amount of effort into her stitched design.
Hers was one of the class favorites.

So was this one by junior Lynette Lee because of her complex stitch design.
Her result was gorgeous and a real eye catcher.

Gentle 8th grader Karen Hung created this lovely flower that popped so beautifully.
And don't you just love the various shades of blue around her stitches?

And here is another with those marvelous value changes 
by extremely hard-working 8th grader Selina Luo.
She went all out creating this amazing piece.