Showing posts with label Staining w/ Oxides. Show all posts

Tuesday, April 30, 2019

STANDING OUT IN A CROWD

REALISTIC CLAY HEAD RATTLES
CERAMICS I
clay, glazes, & oxides

I always love to see all the students heads loaded onto the cart.
So many personalities, cultures, hairstyles and expressions.
So much fun.
Here is another assignment that the kids fear going in, 
but end up giggling and really enjoying themselves.
Let's take a look.
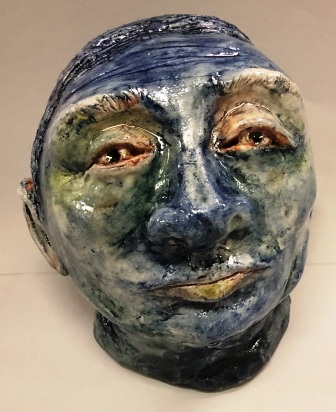
Our first colorful one was done by junior Sara Ryave.
She used all four of our oxides and stained the bisqueware first,
then put our Transparent glaze over top.
So unique and eye catching.

Junior Michelle Son brought in a picture of movie star Marilyn Monroe.
I was so impressed with how well she pulled this face off,
but it's the hair that really calls to me.

And junior Richard Montes chose his cultural background to pull from.
Love the strong facial structure and the very cool headdress.

These two highly expressive faces were done by seniors Augustine Lee & Ashley Scott.

Senior Christian Balbido & junior Jaclyn Dong both really got into this assignment,
Christian doing a portrait of his father that I felt looked very realistic.

We end with junior Lina Kim's grandmother.
I felt it was a beautiful portrait,
Lina expressed that she thought it was so-so.
These kids are always so hard on themselves,
so that when they do like something they've made I get really happy.
I love that Lina added the flowers on her grandmother's shoulder.
A very special touch.

Tuesday, April 16, 2019

UNMASKED

CLAY MASKS
BEGINNING 3-D ART
clay & oxides

My Beginning 3-D kids love this assignment.
For many of them it's their first time to work in clay,
and they are surprised by how much fun it can be.
They take great pride in their creations.
Let's take a look.

Ok, 
got to be honest. 
I'm guessing at a couple of these names.
This first one I think was the creation of senior Sophie Yang.
On these pieces I stress and require lots of surface design.
They have many choices:
inlay, stamping, applique, carving, incising & piercing.
Sophie has used 5 of those which really makes this piece sensory,
so very pleasing to the eye.

This next one is the work of junior Sahana Ramesh,
and she has used all 6 design techniques.
We all enjoyed her elongated face and the way she moved the leaves thru the face.
These pieces are all concave,
and were draped over top a wadded up newspaper taped mold to hold their bas relief form.

8th grader ,
Bhumika Kalaimalai,
 made 2 pieces because her first one on the right broke in half..
I told her no worries;
use the first for extra credit and make a second for grading.
I felt she gave us the most beautiful and balanced surface design in both.

I'm guessing again on this super sweet one here,
could be junior Kiana Hernandez or 8th graders Shivani Kedila or Viviana Cruz.
I will hunt them down on campus and see if they can help me identify them.
Definitely check out the really clean craftsmanship of the construction 
and the staining of the oxides.
Perfection!

I know for sure this is the work of junior Dustine Ansiboy because it was memorable 
to me due to the fact my step-daughter Julie loves owls,
and I knew she would really enjoy this piece.
It also is beautifully crafted and finished.

And I''m pretty sure this belongs to junior Rachel Tibayan.
Rachel is a terrific designer and always comes up with super original ideas.
I also love how expressive it is
(a requirement).

And we end with 11th grader Sandra Chea (a guess here)
& 8th grader Yusuf Karan (who I remember did the one on the right).
I really like putting 2 pieces together so you can see how each student solved the same subject.

I think I've mentioned this before but I really dislike art teachers
who have all the kiddos make the same exact pieces.
I've been in classes like that and there is no critical thinking/problem solving going on.
I never learn in classes like those.
In fact,
I paid ahead of time and then walked out of that kind of  watercolor class
a few years back where the teacher explained nothing,
demoed nothing,
and gave us all the same xerox picture to copy in the exact same colors.
An almost paint by the number technique.
No thank you.
Good-bye.

Wednesday, April 10, 2019

PLANT YOUR GARDENS

NATURE PLANTERS
CERAMICS I
clay, glazes, oxides & misc. plants

This is a wonderfully fun & functional assignment for the clay kiddos.
They made the planters and then for their 4th Quarter Final they were able to plant them.
Below is one of my demos. that I planted several years ago 
and gave as a gift to my son's wife's mother.
Under Mary's watchful attentive care the succulents are thriving as you can see
(she recently sent me this photo so I could see how lovely it's flower is).


So here we have last school years students out in the delicious sunshine planting their pots.
I buy them a big bag of planters mix and several small starter plants to choose from.
I try every year to have a different selection. 
I also encouraged the kids to raid Josh's succulent garden in search of the perfect plants.
And succulents are so hardy and easy to grow,
pretty much fail proof.

Here are a few of the finished planters.
I'm guessing here because I can't find the names of who made which ones so here we go.
I'm pretty darn sure the one above was made by junior Sara Ryave.

And this next one belongs to senior Catherine Lu.
Note those sweet tiny clay flowers in the left corner.

And I believe these last two are the works of juniors Richard Montes and Dustine Ansiboy.

Please correct me young ones if I'm wrong.
But aren't they fabulous?

Thursday, January 24, 2019

WHISTLE WHILE YOU WORK

CLAY WHISTLES
CERAMICS I
clay, glazes, & oxides

In the past several years for the whistle unit,
we have done Burnished Non-Objective Whistles,
but last year I decided to bring back Realistic & Abstracted Whistles;
they actually resemble something or are a made up creature.
The kids had a blast and brought in a lot of whimsy.

Making the clay actually whistle is a real challenge,
but last year the kids caught on pretty quickly,
like junior Dustine Ansiboy above.
We all were highly impressed with her realistic heart form
as well as how she glazed it with ceramic watercolors & Transparent glaze.

We were also super delighted by the rest of these whistles you will see.
Like the one above left by senior Christian Balbido.
The addition of the hat and nose brings in a bit of fun.
Senior Renee Kim choose to try a more realistic view of her shark on the right.
You can kind of see where you place your lips to blow on Renee's shark nose.

Senior Ashley Scott made the adorable piggy on the left.
I love that she placed his smile to the right
as this adds so much personality.
And junior Michelle Son went with a made-up creature with a slightly fierce expression.

Lastly we have senior Shreya Gupta, and juniors Lina Kim and Angela Mak.
Adorable,
 right?

I was told once by alumni Megan King that making her clay piece whistle 
was a highlight of her Whitney High School days.
Makes me so happy!!   

Sunday, November 25, 2018

SPANKING THE CLAY

PINCH/COIL/SLAB PADDLED POTS
CERAMICS II
clay, paddles & glazes

This is such a great assignment for the second year clay students.
They learn how to be more spontaneous with coils, 
how to build an "S" curve,
choose between 5 different lid structures to build and make fit, 
to have a visual flow between lid, pot and handles,
and lastly they are required to paddle the structure to bring in pattern and texture.
And of course the beauty is how different each child has interpreted this assignment.


We start with senior Ylia Madayag.
So many parts of this pot to love;
the triangular lid shape instead of a circular one,
the contrast between coils and slabs as well as the contrast between smooth and texture,
the slight angle of the piece that gives it a bit of whimsy,
and the wonderful pointy overlaps of coil ends.
Such a well designed pot Ylia!

This next beauty is the work of junior Eugene Ho.
Loving the patterned texture he paddled into his sides 
as well as his scalloped edges around the lid and lip.
And the shape of the handles flow really well with the pot.
Bravo young man!

The kids were required to use Oxides to first stain the clay with
 before they applied the Transparent glaze.
Ylia above used Cobalt Carbonate which produces a blue/black color,
and Eugene here used Red Iron Oxide which turns black under Transparent.
Another nice element in Eugene's piece 
is the contrast between the Chili glaze on the inside against the Transparent on the outside.

Next we have the work of junior Julia Ruiz.
Love those overlapping coils,
 the twisted handles, 
and the way she placed them on the horizontal.
I also really like how the lid is not completely flat but seems to be rolling like a gentle wave.

Junior Chloe Chang really followed her own path here which lead to this sensational piece.
She blew off the "S" curve but I'm so glad she did.
I adore this piece just the way it is.
There is so much delicious pattern and texture to find and enjoy,
lots of interesting overlays,
and then that lid makes for an  absolutely fabulous ending.
Woo Hoo Clo!!!!

We end with senior Sarah Oh.
You all remember her, right?
Hee hee.
She has added so much interest just by placing those 2 eyes in there.
Two small elements that end up making this piece so special.
She has also really worked those overlapping coils 
creating a piece that must be touched and turned all the way around.
I also really enjoyed that on some of the coils she wiped off more Red Iron 
so she has a contrast between a dark and light finish.

For me,
this was a very difficult task to pick a favorite
 because there are several things about each one that I love.
Thank you guys for coming thru big time on this assignment
and giving me your all!

Tuesday, November 6, 2018

INSPIRED BY...

Ceramic artist Lana Wilson,
the 8th and 9th graders at Raintree Montessori in Lawrence, Kansas,
taught by Cindy Sears have knocked these slab pieces out of the park!
I believe these were done in her 3-D Art class there 
where they were also doing other art & craft forms as well.
This is the second time I've posted the work of these students.
I cannot begin to tell you how very impressed I am by their craftsmanship and design skills.
Ms. Sears must have really had them do their research into symbols
(very important in Lana's work),
as well as lots of designing before the clay came out of the bags.
Lana lives in Delmar, Ca. and I have actually seen her work in person many years ago 
when I visited a Solana Beach Art Gallery called Trios.
I don't know if she still exhibits there,
but I did explore her website and learned a few of her secrets that she shares.
Fascinating work!
Enjoy Ms. Sears' students works.
Many are even interactive!

Sydney Alexander
Floreno para el Jardin


Michael Campbell
Skater's Stoneware Cabinet


Courtney Goodlet
Miracle Box


Jason Zhou
Pagoda


Tammy Liu
Wings


Emmi Murao
Cats Temple


Friday, September 21, 2018

LEARNING THE ROPES

COIL TRIVETS
CERAMICS I
clay, glazes, oxides, glass shards

Before I have my students build a full on 3-d Coil Pot,
I have them first learn to roll coils and try them in an Inlay assignment.
Inlay is a beautiful way to bring Surface Design into the lid of a Slab or Lump Box.
I've even had kids build it into a side wall for gorgeous results.
To Inlay means to cut away and replace.

So what senior Augustine Lee did above in his sweet home was to roll out a slab of clay,
cut away his outside design format (his house shape),
then to decide where to bring in his inlay design.
He chose two separate places,
the roof attic and the lower floor.
He cut and pierced out those two spots, 
removed the clay,
and replaced with coils,
 a slab carved out shape to later fill with glass shards in the second firing,
 and rolled balls.
He also did a really nice finish with his oxides and glazes.

The kids were also required to incorporate a repetitive stamped design into the outside border area.
You can really see above right where senior Christian Balbido carved away parts of his middle triangle so that he was able to melt glass shards into it at a later date. 
Senior Shreya Gupta (above left) asked if she could draw in her repetitive design 
instead of stamping it.
Of course.
I like to be flexible with new ideas for old requirements.
That's how and why I keep changing up assignments to keep them fresh.
Thank you Shreya!

Superstar last and this year,
junior now senior,
Dustine Ansiboy,
 created one of the most intricate and exciting designs in the class.
I also really liked how junior Liam Abalos
 finished off his piece with black glaze and milky blue glass with the little white dots in the border.
Really striking.

Another favorite was this one by senior Ashley Scott.
I admired her sense of design all year with many of her works being my favorites.
Check out the cool and various stamps she used in her borders,
and how she thought to repeat some of them inside her Inlay.
That creates Visual Flow.
 The way she finished it with the staining of the various Oxides is also quite appealing.
And the melted glass for her windows,
brilliant!

Monday, September 10, 2018

ASYMMETRY IS KEY

PINCH VASE FORMS
CERAMICS I
clay, glazes, staining oxides

After learning how to make a pinch pot in in the beginning clay class,
we take it one step further and make an enclosed asymmetrical form
by putting two pinch bowls together and paddling them into a pleasing form to the eye.
I do ask them to try for asymmetry because many of them have never tried that before,
and they find it quite appealing.
I'm also requiring added surface design.

This one by junior Sara Ryave was one of my favorites because of the bulbous form,
the beautifully incised designs,
and the way she finished it with colored oxide staining.

I also really liked this next one by junior Dustine Ansiboy
because of that flattened side with the texture showing thru the glaze,
 as well as the way the Rutile Oxide looks over top our Tan glaze.

And this one was so unique in it's form and glazing 
to make it a standout by senior Augustine Lee. 

My eye also really enjoyed this one by junior Lina Kim because she has captured a lot of movement
by pressing the edge of the paddle into the clay's surface 
creating a cocoon looking vase.
I also look at it and see a pregnant Middle Eastern garbed woman.
I'm wondering if Dustine used that as her inspiration.

This can be a fast-paced  & fun technique,
so several of the kids made a couple.
Here are Lina & Dustine again with their extra credit pieces.
The opening for the vase had to be asymmetrically positioned as well,
and required an organic opening;
ripping, folding over, etc.

We end with junior Richard Montes' gently undulating stamped form.
And don't you just love that bit of glaze snaking over the top rim?

I hadn't done this assignment for quite some time so it was really great to bring it back
and see the marvelous works these kids came up with.